Making a basic 2D member model
Modelling from 2D members
This tutorial will demonstrate how to make a 2D model from scratch in GSA-Grasshopper. The methods here are applicable to modelling slabs, shear walls, pad foundations, rafts etc.
The key learning outcomes are:
- Making a 2D member and meshing it
- Introducing inclusion points and curves in the mesh
- Assigning 2D section properties
- Creating advanced meshes with holes
- Local refinement in meshes
Oasys GSA-Grasshopper: Basic 2D member model - modelling 2D members
Creating a 2D member
Select Create 2d member  from the Geometry tab.
Hovering over the list of inputs tells us that we need: Brep, 2D properties and mesh size. Inclusion points and inclusion curves are in brackets are optional, so are shown in brackets.
To create a surface, we have used the 4point surface component.
Input the surface into the Brep input. This is your 2D member.
Adding a support point
Create an internal support point for the member using the Evaluate surface component.
- Right click on the surface input of the Evaluate surface component to reparametrize.
Select Create support  from the Geometry tab and connect. Connect the corner points and the internal point to this component to create corner and internal supports.
Set your restraints in the Create support component check boxes.
Creating a mesh
Select the Elements from members  component in the Geometry tab. Input into your Create 2d member component .
Your mesh will be visible in the Perspective view.
Use the slider to change the mesh size.
Tip 1: A triangular mesh can be created by setting the mesh size to negative.
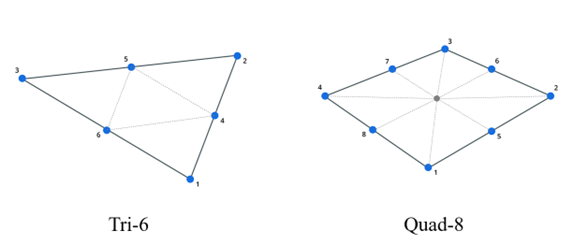
Tip 2: You can create higher order (Tri-6 and Quad-8 elements) by setting the element type input to 1 in the Edit member component. GSA-Grasshopper creates a special mesh type called Ngon mesh which is not directly supported in Grasshopper. As a result, one mesh face (2D element in GSA) can be made from more than 3 or 4 points for higher order elements. (This is not the case with a normal mesh in Grasshopper).
The Ngon mesh faces consist of several subfaces. These are always triangular to stay planar and are divided as shown in the images below:
You can see these by visualising the Elements from members component:
Inputting geometry
Select the Analyse model component  from the Analysis tab.
Input your geometry (Elements from members and Create 2D member into your Analyse model component ).
In this example we want to demonstrate how to create loads directly from 2D members, so have chosen the Create face load component  from the Loads tab.
Finally, we need to select a property in order to analyse. Here, we have chosen Create 2D property  from the Properties tab.
- Input thickness using the slider.
- Then select the Create material component
 to create a material type.
Tip: You can use the Edit 2D property
component to set the local axis of the 2D member and its constituent elements.
Plug into the Create 2D member component to run an analysis.
Choose the Select results  component to view the type of analysis case run, and the case ID.
We have also chosen the 2D contour results  component to preview results in the Perspective view:
- Use the dropdown to view the results for different components, e.g., bending moment, shear moment and stress.
Creating elements from members
Oasys GSA-Grasshopper: Basic 2D member model - modelling 2D members
The elements from members component can be found in the geometry tab.
Note: The Create model and Analyse components both have a built in Elements from members functionality that can be toggled on /off.
To create elements, we first need to create members.
- In this example, we have chosen the Create 2D members component , from the Geometry tab.
- Use the built-in Grasshopper component Rectangle, to create a rectangle.
- Input your rectangle into the Create 2D members component to create a 2D member, then Create elements from members to create elements from the member (mesh).
Note: Element2d from the Brep component
in the Geometry tab also lets you make 2d elements from members. It can work for surfaces with curvature.
Tip: Use the Mesh edges component to show the edges more clearly.
Adding a hole to your mesh
Select the built-in Grasshopper component Circle.
Input the Area component to get the centre point.
Use the slider to input a radius.
Use the Boundary surface component to combine the original rectangle with the circle. This will automatically create a void when inputted into the existing Create 2d members and Create elements from members components.
Inclusion objects and local refinement
You can also include points on your mesh. Select the Scale component and input to your rectangle. Use Explode to get corner points.
Plug in the Explode component into the curve input located inside the Create 2D members component to view curves.
Remove the curve input and add a member. In this example we have chosen the Create 1D member  component from the Geometry tab.
Plug in Explode to the curve input inside the 1D member component, and connect that to the Create elements from members component .
We now have the option to import a mesh size into the 1D component.
The smaller mesh size is now visible along the inclusion lines.